Making Your Own Pressed Flower Art for a Whimsical Wall
Pressed flowers are one of the most charming and timeless ways to bring nature into your home. If you’re looking for a creative, affordable, and aesthetically pleasing way to enhance your home décor, making your own pressed flowers for imaginative wall art is the perfect solution. This DIY project combines creativity, mindfulness, and interior design into one rewarding project.
Whether you’re decorating a bedroom, living room, hallway, or creative workspace, pressed flower wall art adds a soft, romantic, and whimsical touch to any space that never goes out of style. In this comprehensive guide, you’ll learn everything from choosing the right flowers to pressing techniques and design layouts to framing ideas and wall placement tips.
Why pressed flower art is perfect for playful wall decor
Pressed flower art has gained popularity due to its natural beauty and versatility. Unlike store-bought wall decor, handmade floral decorations tell a personal story and reflect your creativity.
Advantages of DIY wall art with pressed flowers
- Adds a natural and playful aesthetic to any room.
- Budget-friendly compared to traditional artwork.
- Environmentally conscious and sustainable decor option.
- Adaptable to your interior design style.
- Therapeutic and relaxing DIY activity.
By creating your own art with pressed flowers, you can create wall decor that is both artistic and very personal.
Choosing the Right Flowers for Pressed Flower Art
Choosing the right flowers is crucial if you want to use pressed flowers for imaginative wall decoration. Not all flowers are equally suitable for pressing, so careful selection will ensure better results.
The best flowers for pressing
- Pansies
- Daisies
- Roses (single petals are best)
- Ferns
- Lavender
- Gypsophila
- Cosmos
- Buttercups
Flat flowers with thin petals are generally easier to press and retain their color well.
When to pick flowers
- Pick flowers in the morning after the dew has dried.
- Choose fresh flowers without moisture.
- Avoid flowers that are too thick or wilted.
This step ensures that your pressed flowers retain their structure and vibrancy.
Methods for pressing flowers: step-by-step instructions

There are several effective methods for pressing flowers. Below are the most popular techniques that are best suited for beginners.
Traditional method of pressing with a book
This is the most accessible and inexpensive method.
Steps:
1. Place the flowers between two sheets of parchment or blotting paper.
2. Place them in a heavy book.
3. Stack more books on top to apply pressure.
4. Leave the book undisturbed for 2–4 weeks.
This method is suitable for most flowers and requires few tools.
Method using a flower pressing kit
Flower pressing kits offer faster and more consistent results.
Steps:
1. Place the flowers between absorbent sheets.
2. Tighten the press with screws.
3. Check after 7–14 days to see if the flowers are dry.
This method is ideal for anyone planning multiple art projects with pressed flowers.
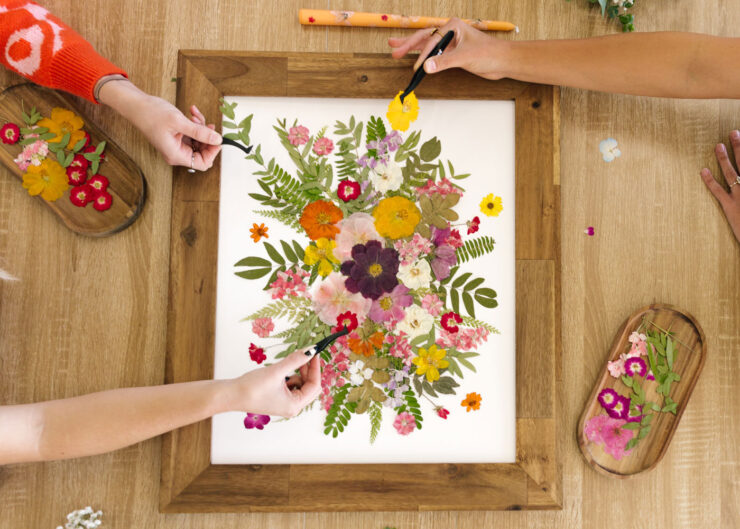
Designing your pressed flower artwork

Once your flowers are completely pressed and dried, it’s time to design your artwork. This is where your creativity really comes into its own.
Popular design ideas for pressed flower art
- Minimalist frames with a single flower
- Botanical specimens with labels
- Flower wreath compositions
- Abstract flower arrangements
- Flower arrangements by color theme
Before gluing anything down, lay your flowers out on paper or cardboard to experiment with balance and spacing.
Background options for floral art
- White or cream-colored cardboard for a clean look
- Vintage book pages for a rustic aesthetic
- Handmade paper for added texture
- Soft pastel backgrounds for a playful decoration
The background should complement the pressed flowers, not overwhelm them.
How to properly secure pressed flowers
Securing pressed flowers correctly ensures longevity and prevents damage.
The best adhesives for pressed flowers
- Acid-free craft glue
- Clear-drying PVA glue
- Archival adhesive dots
Use a toothpick or fine brush to apply just a small amount of adhesive. Too much adhesive can cause staining or warping.
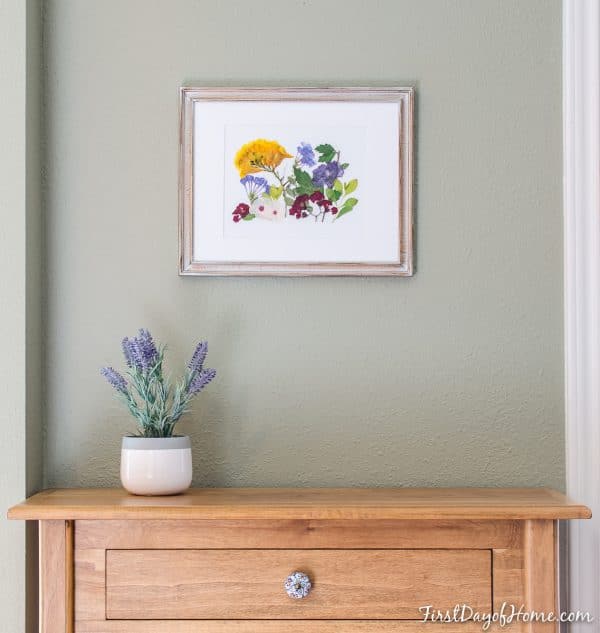
Frame ideas for imaginative wall design
Framing plays an important role in the final appearance of your pressed flower wall art.
The best frame styles
- Floating glass frames for an airy look
- Vintage wooden frames for rustic charm
- Thin metal frames for modern interiors
- Shadow gap frames for layered designs
Make sure the frame includes UV-protective glass to prevent fading over time.
Create an imaginative wall gallery with pressed flower artworks
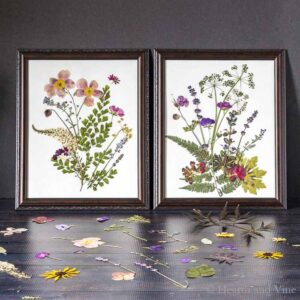
A single pressed flower artwork is beautiful, but an entire wall full of artworks creates a stunning visual effect.
Tips for designing an imaginative wall
- Combine different frame sizes to create an interesting eye-catcher.
- Keep an even distance between the frames.
- Combine floral art with mirrors or typography.
- Use soft, natural colors.
Pressed flower artworks are particularly well suited for gallery walls, especially in boho, cottagecore, and Scandinavian-style interiors.
The best rooms for pressed flower wall art
Pressed flower artworks are versatile and suitable for many rooms.
Ideal rooms for playful wall decorations with floral motifs
- Bedrooms for a calming atmosphere
- Living rooms as an eye-catching feature
- Home offices for creative inspiration
- Hallways and stairwells for visual flow
- Children’s rooms for a gentle, nature-inspired theme
Avoid areas with high humidity, such as bathrooms, to protect the artwork.
How to preserve and care for pressed flower artworks
Proper care will ensure that your homemade pressed flower artworks remain beautiful for years to come.
Preservation tips
- Do not expose the artworks to direct sunlight.
- Use UV-protective glass.
- Avoid excessive moisture.
- Wipe the frames gently with a dry cloth.
With proper care, pressed flower artworks can retain their charm for decades.
Why DIY pressed flower art is a timeless trend
In an age of mass-produced decorations, handmade pressed flower art stands out for its meaning and authenticity. It combines sustainability, creativity, and individuality—qualities that modern homeowners increasingly value.
By creating your own pressed flower art for imaginative wall decor, you are not only decorating your home, but also creating a story, capturing the beauty of nature, and creating art that appeals to the emotions.
Final Thoughts: Start Your Pressed Flower Art Journey Today
Pressed flower art is more than a DIY craft; it is a creative expression that brings warmth and personality into your living space. With simple tools, patience, and imagination, you can transform ordinary flowers into stunning whimsical wall décor.
If you are searching for a relaxing project that results in elegant, nature-inspired home décor, pressed flower art is the perfect place to start.